
The ability to capture screenshots on your iPhone can be incredibly useful, allowing you to preserve and share moments from your device’s screen. This comprehensive guide will walk you through the process of taking screenshots on different iPhone models, ensuring that you never miss out on capturing important information, hilarious conversations, or memorable images.
Table of Contents
Capturing Screenshots on Your iPhone
When it comes to capturing screens on your iPhone, there are several methods at your disposal. Below, you can explore these techniques and choose the one that best suits your convenience.
Method 1: Using the Volume and Side Buttons keys
If you’re using an iPhone with Face ID – the facial recognition feature – follow these detailed steps to take a screenshot:
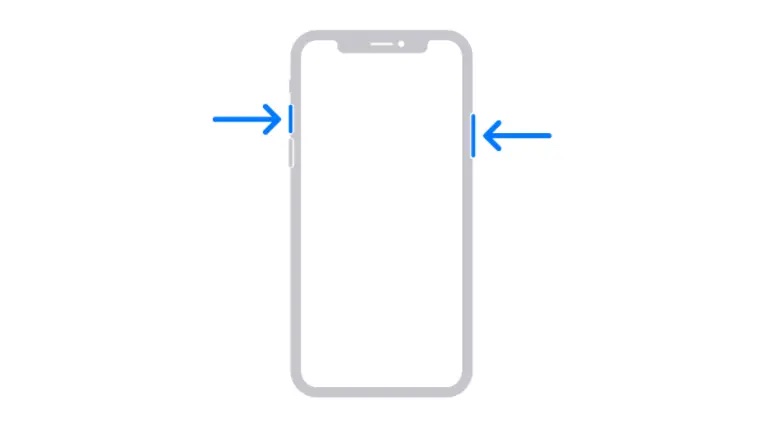
- Locate the app, webpage, or content you intend to capture. Ensure that everything is properly displayed on the screen.
- Simultaneously press the side button (also known as the power button) and the volume up button. Make sure to press both buttons at the same time.
- As you press these buttons, the screen will briefly flash, indicating that the screenshot has been successfully taken.
- A miniature version of the screenshot will momentarily appear in the lower-left corner of the screen. This acts as a preview. You can tap on it to access editing options or choose to save it as is.
- To view the captured screenshot, head over to the Photos app.
This method is applicable to iPhone models starting from the iPhone X and encompasses subsequent releases such as the iPhone 11, iPhone 12, iPhone 13, and iPhone 14.
Method 2: For Older iPhones with a Home Button
If you’re utilizing an older iPhone model equipped with a home button, follow these specific steps to capture a screenshot:
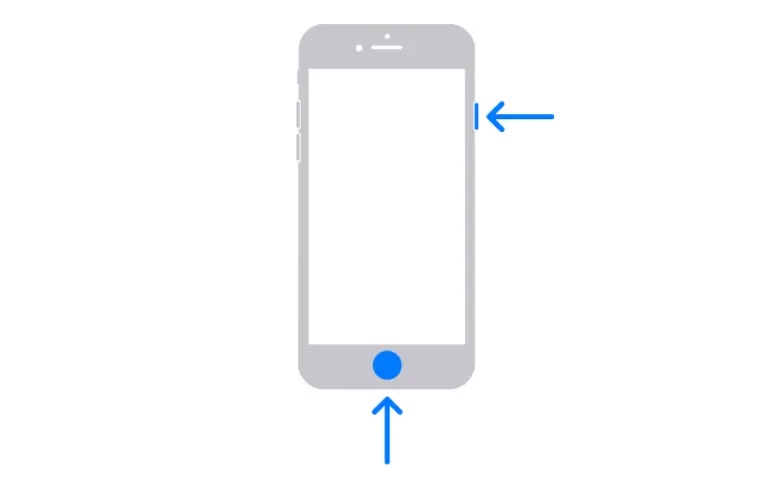
- Open the desired app or webpage and ensure that the content you want to capture is properly displayed.
- Simultaneously press the home button and the power button located on either the top or side of your device. Press both buttons together for a successful screenshot.
- As the buttons are pressed, the screen will momentarily flash, signifying the successful capture of the screenshot.
- The screenshot you’ve taken will emerge in the lower left corner of the screen.
- Interact with the preview to make edits, or if no edits are necessary, the screenshot will be automatically saved.
- Access the screenshot in your Photos app for future reference.
Method 3: A Buttonless Alternative
If your physical buttons are unresponsive or if you prefer not to use them for screenshot purposes, consider this alternative approach:
- Launch the Settings app on your iPhone.
- Scroll down and select “Accessibility” to access various accessibility features.
- Within the Accessibility menu, choose the “Touch” option.
- Locate and tap on “Assistive Touch” to activate the feature.
- Upon activation, a small, white dot surrounded by a gray square will appear on the edge of your screen. This signifies the presence of Assistive Touch, a tool for executing customizable actions.
- Tap on “Customize Top-Level Menu” to tailor your Assistive Touch menu.
- Expand the menu by tapping the “+” symbol next to “Six Items.”
- Tap the prominent “+” button. From the list of options, select “Screenshot” and confirm your choice by selecting “Done.”
- Return to the app, webpage, or content you wish to capture with a screenshot.
- Tap the Assistive Touch dot to unveil a menu of options.
- Select “Screenshot” from the menu. As you tap the option, the screen will briefly flash, indicating the successful capture of the screenshot.
- Engage with the screenshot preview for editing purposes, or opt to save it as is.
- Your screenshot will be saved within your album collection for easy retrieval.
Method 4: Taking Scrolling Screenshots
If you’re keen on capturing an entire webpage – from top to bottom – follow these steps:
- Capture a standard screenshot of the webpage using the methods mentioned above.
- Access the preview of the screenshot located at the bottom left corner.
- Within the preview, click on the “Full Page” option situated at the top right.
- Once selected, a cropping tool will appear. Use this tool to define the specific area of the webpage you wish to capture.
- After cropping, confirm your selection by tapping the “Done” button or choosing to share the screenshot using the “Share” button.
Answering Common Queries
What’s the simplest method for taking an iPhone screenshot?
The easiest way is to use the button combinations provided above.
Can I capture a screenshot with just one hand?
Yes, you can achieve this using the Assistive Touch method detailed earlier.
Is it possible to capture a screenshot without using physical buttons?
Absolutely, the Assistive Touch feature enables you to take screenshots without relying on the physical buttons.
Can I use a three-finger swipe to capture a screenshot?
Unfortunately, iPhones do not support the three-finger swipe gesture for screenshots, unlike some Android devices.
Can I capture screenshots without using the power button?
Yes, the Assistive Touch feature offers an alternative approach for taking screenshots without the need for the power button.
Can I annotate or draw on a screenshot before saving it?
Yes, after taking a screenshot, you can tap on the preview that appears and then select the “Markup” option. This will allow you to draw, write, or add text to the screenshot before saving it.
How do I find my screenshots if I want to see them later?
All your screenshots are automatically saved in the Photos app. You can find them in the “Screenshots” album. You can also use the search function in the Photos app and search for “Screenshots” to find them quickly.
Can I take screenshots of videos or movies I’m watching?
Yes, you can take screenshots of videos or movies playing on your iPhone. However, keep in mind that some streaming apps might have restrictions on taking screenshots of their content.
Are there any apps that can help me take screenshots with more features?
While the built-in screenshot methods are quite versatile, there are third-party apps available on the App Store that offer advanced screenshot features, such as scrolling screenshots, more editing options, and direct sharing to social media platforms.
Can I take screenshots in apps that disable screenshots?
Some apps, particularly those handling sensitive content like banking apps, might disable the screenshot functionality for security reasons. In such cases, the standard screenshot methods might not work.
How can I capture a specific part of the screen, like a single window or dialog box?
The built-in screenshot methods capture the entire screen. However, if you want to capture a specific part of the screen, you might consider using the Markup feature after taking a screenshot to crop and focus on the desired area.
Can I set a timer for taking screenshots?
As of my last update, iPhones do not have a built-in timer feature for taking screenshots. However, you can use the built-in Timer in the Camera app to delay taking photos, which could be used to prepare for a screenshot.
Can I take screenshots in apps while using Split View or Slide Over on iPad?
Yes, you can take screenshots while using Split View or Slide Over on iPad just like you would on a regular screen. The screenshots will capture the visible content in the active app or window.
Do screenshots take up a lot of storage space on my device?
Screenshots are usually small in file size compared to photos and videos. However, if you take a lot of screenshots, they can add up over time. You can manage and delete screenshots you no longer need to free up storage space.
Can I capture a screenshot of my iPhone’s Lock Screen or Notification Center?
You can capture a screenshot of the Lock Screen or Notification Center. However, sensitive information might be displayed, so be cautious when sharing such screenshots.
Final words
In conclusion, screenshotting on your iPhone empowers you to capture and share moments effortlessly. Whether you’re using Face ID or a home button, these methods are simple and versatile. Assistive Touch provides a buttonless alternative, and features like Markup enhance your screenshots. Stay updated, explore, and make the most of this powerful tool to freeze memories, save information, and share your screen with ease.
See More: How to Take Screenshots on Windows & macOS-powered Laptops and PCs