
We often need to take screenshots on a laptop or PC for future reference. Whether it is Windows Laptop/PC or Mac you can capture the screens, save them in JPEG or PNG format for future use. Both operating systems come with inbuilt features that can be executed through short keys and commands. But it can be challenging if you are unaware of them. But fret not!
In this article, we will explore different ways to take screenshots on laptops and PCs. Be it Windows or macOS powered laptops, we will look at each of them in detail.
Table of Contents
How to take screenshots on Windows laptops and PCs
There are different methods to capture screenshots on a Windows device. The steps remain regardless of the OS version. You can use this method on almost every Windows OS like Windows 11, Windows 10 and Windows 7. Here you go:-
1. Take a screenshot on Windows laptop using Snipping Tool
Most of you already know that Windows 10 and Windows 7 come with an application called “Snipping Tool” that allows you to capture any screenshot. This tool allows you to directly save the image without pasting it elsewhere. Here’s how to use the Snipping Tool.

- Head to the Start Menu and search for “Snipping Tool”.
- Open the application and select options such as ‘New’, ‘Mode’, ‘Delay’, ‘Cancel’, and ‘Options’.
- With New button you can take a screenshot on a laptop in whichever form they prefer (freeform, without any preset dimension or shape).
- The ‘Mode’ option, on the other hand, allows you to choose the kind of screenshot shape you want – you can choose anything from full screen to rectangular to a free-form shape.
- The ‘Cancel’ button will put the process off, while the ‘Delay’ option will let you set a timer for taking a screenshot.
See More: Best Free Screen Recorders for Windows 10
2. Print screen in Windows using this key
Apart from the Snipping Tool application, there are a bunch of other options for taking screenshots on Windows PCs and laptops. One such option is the Print Screen key.
You can use this option on almost all Windows versions. To do this, you need to follow the steps given below:-
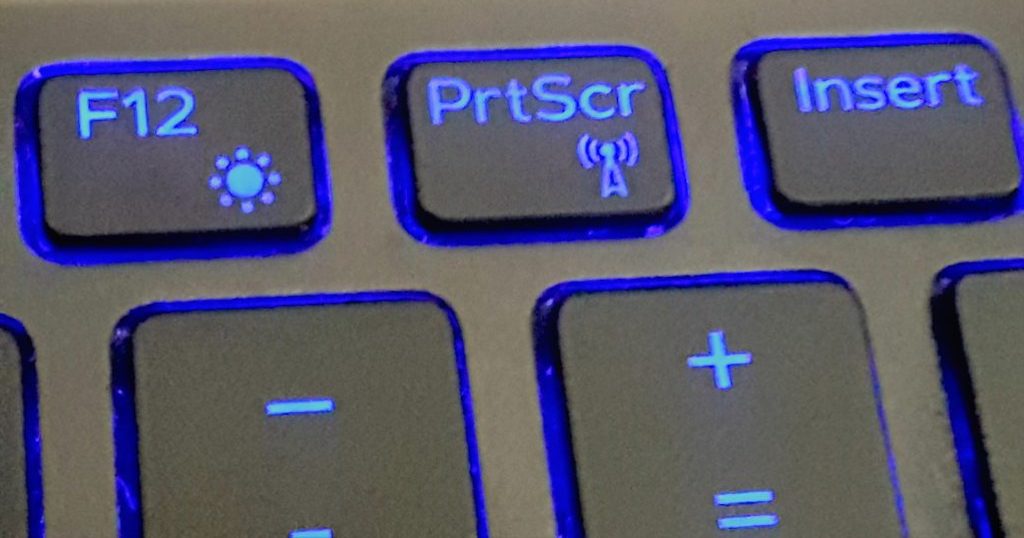
- Find the PrtScn key on your keywords. You can find it on the top right corner of your keyword.
- Press the key to take the screenshots of the entire active screen
- Now open paint tool or Microsoft Office or any other program where you can paste the captured screenshots
- That’s all, You can save the image to your desired location
Note: On some laptops or computers, you may have to press the ‘Fn’ key along with the PrtScn key.
3. Alt+PrtScn
- These keys combination copies only the active window to the clipboard, which you can then paste into another program.
- Use the PrtScn button with the ‘Alt’ key to take a screenshot on Windows 7 or Windows 10 laptop.
4. Windows key+Shift+S
This combination allows you to capture a specific part. All you have to do is use Windows + Shift + S keys together. This will dim the screen lighting and replace the mouse pointer to drag and select the part of the screen you want to capture.
The screenshot will be copied to the clipboard which you can then paste into other programs that support the image.
5. Directly save the screenshot on PC using Windows key+PrtScn
These key combinations are for those who do not want to copy the screenshot to the clipboard. Windows + PrtScn keys can be used together to save the screenshot as an image file. Once you press the hotkey, it will take a screenshot of the entire screen and store it in the “Pictures” folder in a subfolder named “Screenshots”.
6. Windows key+G
If you are a gamer then this option is for you as it allows you to take screenshots while playing the game on your PC or laptop. all you have to do is: –
- Press the short keys Windows + G together. Then, click on the camera icon or press Windows + Alt + PrtScn keys to take a screenshot.
- The screenshots will be saved in the video folder in a subfolder called “capture”
- Also, if you play games on steam then you can use F11 key to take a screenshot. It will be saved in the steam folder.
How to capture screenshots on macOS-powered laptops and PCs
There are also several options on macOS that you can use to take a screenshot. We will look at each one of them which has its own benefits.
1. Command+Shift+3
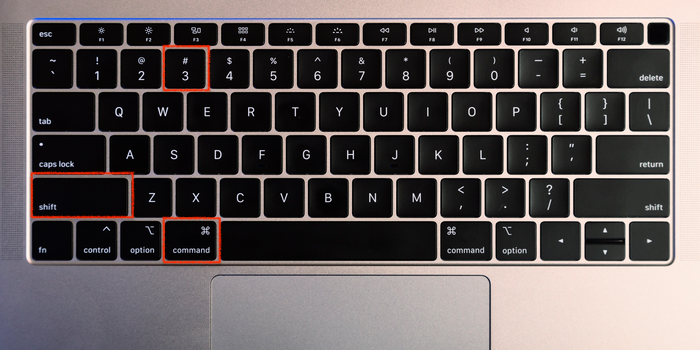
This is the most commonly used command which allows you to take a screenshot on macOS laptops/ PCs. All you need to do is simply, press these three keys together, and it’ll capture the entire active screen. By default, the screenshots will be saved on the desktop which you can modify as per your requirement.
This is the most commonly used command that allows you to take a screenshot on a macOS laptop/PC. All you have to do is press these three keys together, and it will capture the entire active screen. By default, screenshots will be saved on the desktop which you can modify as per your requirement.
2. Command+Shift+4
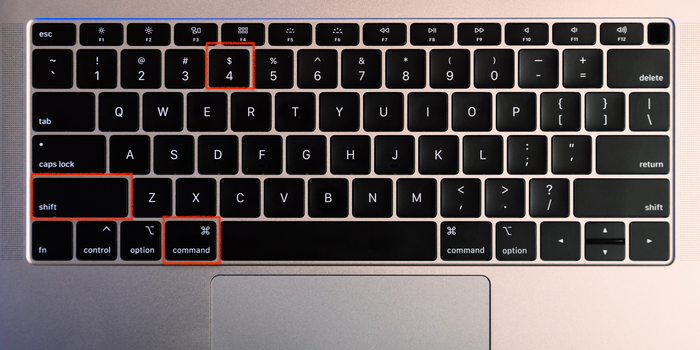
This is another way to take screenshots of active windows on a macOS PC and Laptop. However, this is a slightly advanced command and requires you to select the specific part of the screen you want to capture. As before, you have to press all three keys simultaneously and it will turn your cursor into a crosshair. Now you need to select and drag it anywhere around the screen to take a screenshot.
- You can also press and release the space bar. This will turn the crosshair into a small camera icon. Now, hover the icon over the window you want to capture so that it is highlighted, and then click it or press Enter.
- With this command press and hold the space bar (to highlight an area but before releasing the mouse button or trackpad) to lock in the size and shape of the selected area and move it anywhere on the screen. This is handy if the initially selected area is slightly off.
- Finally, you can hold the ‘Shift’ key after dragging to highlight an area, but before releasing the mouse button, to lock each side of the selected area, keeping the bottom edge free. keeping up or down.
3. Command+Shift+5

This option basically gives you a free hand on screenshots. Once the command is invoked, you see a box on the screen, which you can adjust to your liking, and a bunch of other options.
- Now simply press ‘enter’ to take a screenshot of the selected area or select ‘Capture selected portion’ option from the small panel below.
- The panel also includes ‘Capture Enter Screen’ and ‘Capture Selected Window’ buttons, as well as two video-recording buttons that let you record your entire screen or a selection of it and a ‘Capture Selected Window’ button to select that drive. option’ button that you want to save. Screenshots, setting timers, among other things.
- There’s an ‘X’ button on the left to close the screenshot panel, which can be done with the Escape key.
4. Command+Shift+6
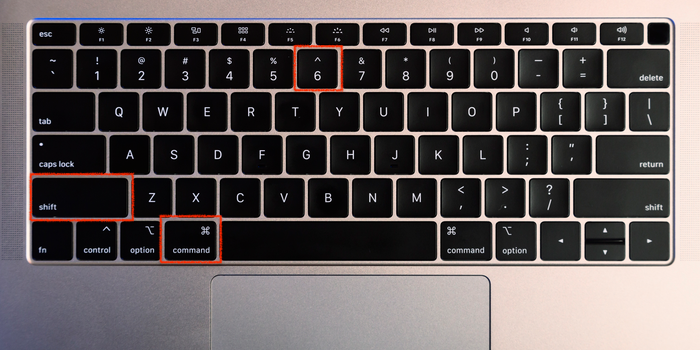
You can use this option on MacBooks that have a Touch Bar. This will allow you to take a screenshot of the Touch Bar.
As mentioned earlier, screenshots taken on a macOS laptop using any of the above methods will be stored (by default) on the desktop. However, you can change the location to any drive/folder of your choice.
To do this, you need to simultaneously press Command-Shift-5 then, go to Options and select Save Location. You can define the folders or drives where all your future screenshots will be saved.
See More: Best Free Screen Recorders for Mac
That’s all folks. These were some of the easiest methods to take screenshots on Windows & macOS-powered Laptops and PCs. Do let us know if this was helpful for you through the comment box.