

The Raspberry Pi was first introduced to the public in 2012 as a small credit card-sized computer with advanced features that you see on larger PCs, including USB ports, internet connectivity and HDMI capability. Throughout the years the Pi has evolved to keep pace with current technologies on the market, including VPN technologies. I’ll explain to you how to retrofit your own Raspberry Pi into a VPN server.
Table of Contents
Four Steps to Making Your Own VPN Server via the Pi
What is a VPN, you ask? VPNs stand for virtual private networks. What they do is that they create an encrypted tunnel between your computer and the network you are accessing services from, either through a government-made encryption device or application.
In this case, we’ll be discussing the latter. I happen to like VPNs because they protect my computers and my private network from illegal government spying and data theft. Coupled with antivirus suites, this provides a robust form of security that keeps your network private and secure.
The Raspberry Pi is perhaps one of the ultimate expressions of taking technology to the next level. As opposed to using large form servers where you would need to shell out hundreds of dollars, here we will do a rundown of the four steps on how to set up the Raspberry Pi and run it as a VPN server.
Step 1: Gather Components
First, you’re going to need the parts necessary to construct your server. This tutorial assumes you already have a Raspberry Pi computer with the Raspbian operating system installed (preferably the Stretch or Jessie versions). In addition to this, you’ll also need:
1 x SD card reader
1 x Micro SD Card
1 x Ethernet Cable or Wifi Dongle (Pi 3 has this capability built-in)
Step 2: Initial Configuration/Double-Hop Connection
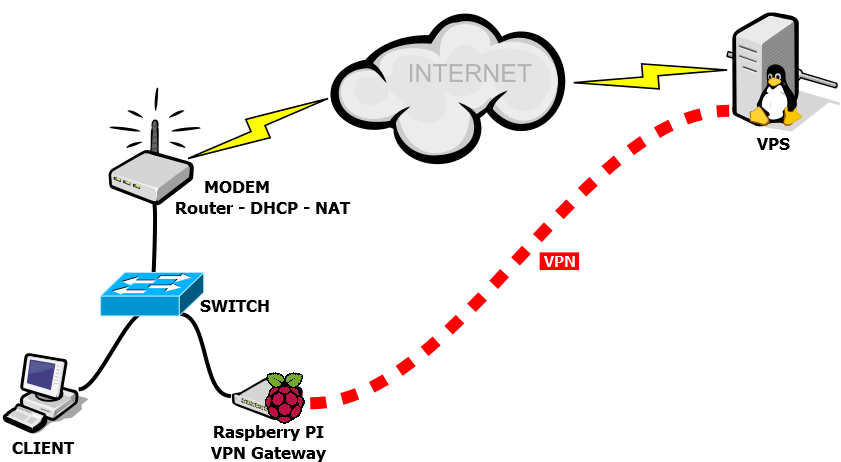
On my path to make a Pi a VPN server, I had to create a double-hop connection in order to make this process feasible. When making a Raspberry Pi VPN server, you’re going to need to include an actual VPN server on top of Rpi VPN that you are making. Double-hop connections essentially doubles the layer of security your server will provide. When choosing a VPN service, I picked the one that had a large amount of servers within its inventory that is arrayed worldwide. One of the other criteria that I had in choosing a service is that it supports the OpenVPN protocol, which is the current standard in secure communications. ExpressVPN has a large fleet of servers, and is reputable in its privacy policies.
I downloaded ExpressVPN and installed the app into Rpi, which is already a fairly lengthy process itself. You can read up on the instructions of how to configure ExpressVPN on your RPi device.
Step 3: Startup
Once you have the correct Raspbian OS, you will need to have an Ethernet connection between the Pi device and your router, and configure your interface with the eth0 argument. If on the other hand you do not have a direct connection to the router, you will need to configure it as wlan0 instead.
SSH server mode is required for this evolution, which is enabled through the Interfacing Options menu. Terminal users also have the option of inputting this line in the terminal:
sudo raspi-config
Keep in mind that SSH will not be enabled until you reboot RPi. The next step is to install PiVPN, where you can download via GitHub. Skip the browser portion since you’ll already be in SSH mode. When the terminal comes up, enter:
curl -L https://install.pivpn.io | bash
There will be a prompt following this pertaining to updates and dependencies. Accept them all and wait a bit until the installation process kicks off. The PiVPN installer will display via a graphical interface.
You need to let the installer set a logical static IP address for you (unless you already have one on hand). This is the part where you will need to choose between the eth0 or wlan0 interfaces – the former which serves as your hardwired connection and the latter for your Wifi functionality. By allowing the PiVPN installer to enter in preset values for your static IP, they will mirror your router’s configuration.
The RPi will take a moment to configure and calibrate itself, and you will see visible activity within the interface through scrolling lines of text. The PiVPN interface will then prompt you to select a local user (in this instance pi will show up as your local user name). You will have the option of adding on other users later.
After the installation is done, you can enter the pivpn command in the terminal and type in other options, such as:
pivpn -a newadditional user nopass
Entering this command will create a new profile under the username “newadditionaluser” with no password assigned to it.
Step 4: Enable upgrades
In this step, you will need to open up a communications port in your RPi. You will get a prompt asking if you want to enable unattended upgrades. Choose Yes as your option. When it comes to security, you do not want to skimp out on upgrades. Not enabling them gives hackers incentive to run port scans and breach your network.
Set Up Your Client
When the reboot finishes up, you need to open up the terminal and type:
pivpn add
A prompt will come up where you need to name your client and assign a password. Every time you boot up the Rpi device, it will go through this server. This ensures that your gaming sessions, apps, internet browsing and VoIP services are secure.
Conclusion
In closing, I gave you a little background on the Raspberry Pi. I further explained how to make your Pi into a VPN server of your own to provide a layer of security for the devices in your network. Raspberry Pi computers are cheap security solutions that typically average between $5 to $50 per unit, so you will be getting yourself a worthwhile investment that will do wonders for your network defense.